The power strip is the honest part of your cable problem.
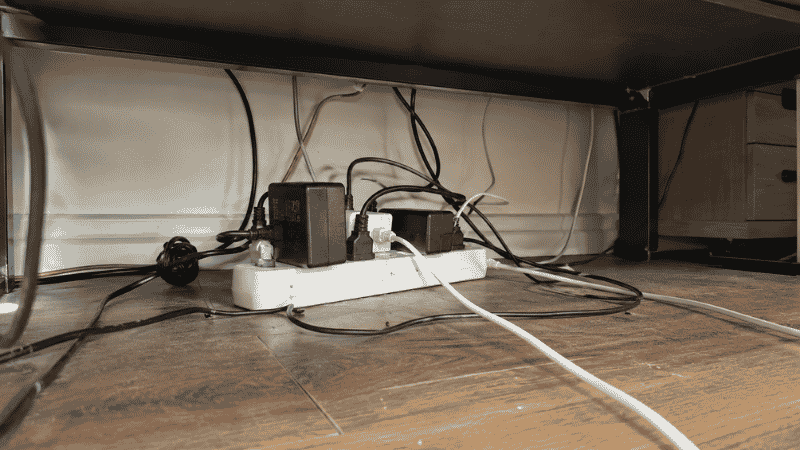
Most cable management guides focus on the cables themselves — clips and sleeves and velcro ties — and those help. But the real source of under-desk chaos isn’t the cables. It’s the power strip sitting on the floor, with six adapters plugged into it and cables radiating outward in every direction. Route the cables neatly and the power strip is still down there, a squat plastic rectangle covered in bricks, sitting where people kick it and where dust collects.
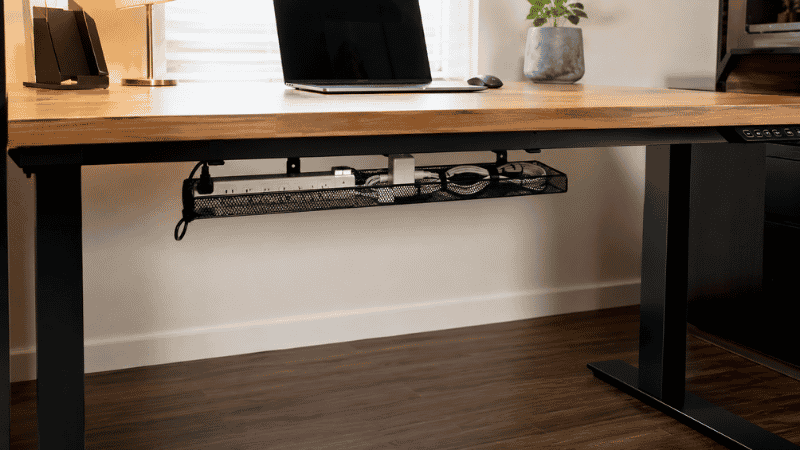
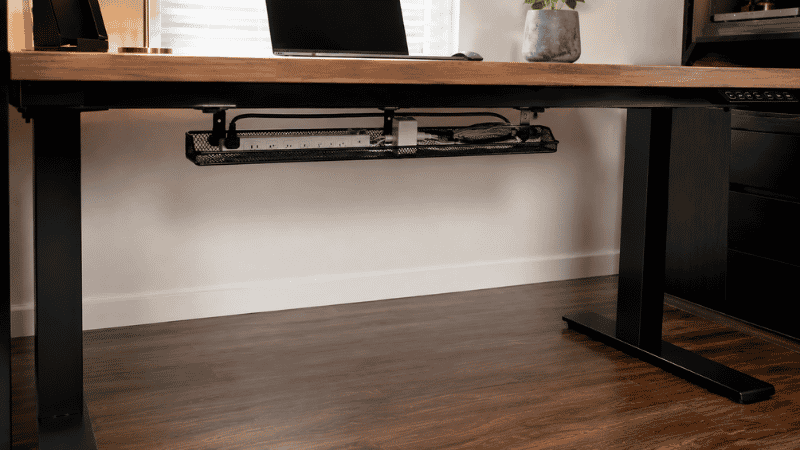
A cable tray solves this at the source. It mounts under the desk and holds the power strip and all its attached adapters completely off the floor, completely out of sight. From above, your desk looks like it has no cables at all. From below, everything is contained in one organized system instead of scattered across the floor.
This guide covers what a cable tray actually is, the three types and when each one makes sense, what to look for before buying, and how to install one without making a mess of the process.
— Daniel Shaw, 7 years working from home, one power strip that lived on the floor for two years before I finally dealt with it
Key Takeaways
- A cable tray mounts under the desk and holds the power strip and cable bulk completely off the floor — the single highest-impact cable management upgrade for most home offices
- Three installation types: clamp-mount (no drilling, removable), screw-mount (permanent, most stable), and adhesive (lightweight use only)
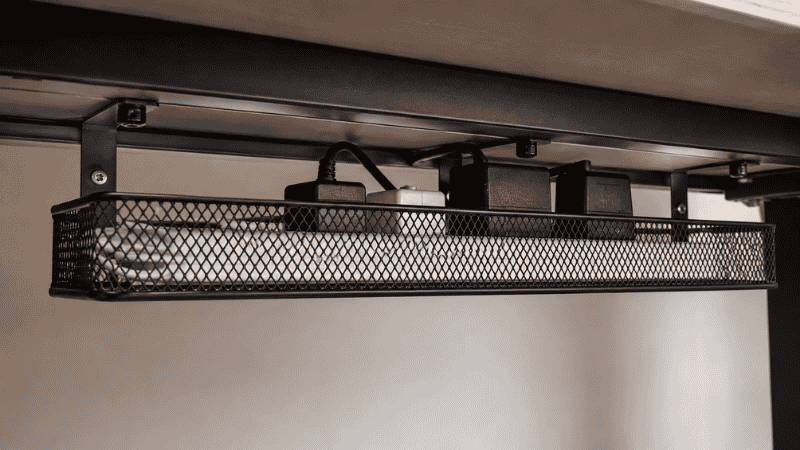
- Metal mesh cable trays are the most durable and maintain airflow around adapters that generate heat — important for power strips with multiple bricks plugged in
- The most common installation failure: adhesive trays used to hold a heavy power strip — the adhesive loses grip over weeks under sustained weight
- Measure your desk thickness before buying — most clamp-mount trays work on desks 1 to 3 inches thick, but some desks fall outside this range
What Is a Cable Management Tray and What Does It Actually Do?
A cable management tray — also called a cable basket, wire basket, or under-desk cable organizer — is a container that mounts to the underside of your desk and holds cables, a power strip, and power adapters in an organized, contained space below the desk surface.
The difference between a cable tray and other cable management tools is scope. Cable clips route individual cables. A cable sleeve bundles a group of cables into one run. A cable tray handles the bulk — the power strip itself, the six or eight adapters plugged into it, the excess cable length that coils up when cables are too long for the distance they’re covering. None of the other tools address this, because none of them can hold the weight and volume of a full power strip setup.
The visual effect of installing a cable tray is usually more dramatic than people expect. The floor under the desk clears completely. The desk surface, which was already managed with clips, suddenly looks even cleaner because the source of the cable runs is now organized rather than scattered. The whole setup looks intentional rather than improvised.
Under Desk Cable Tray: Three Types and When Each Makes Sense
The type of cable tray that works for your desk depends on two things: how heavy your power setup is, and whether you want a permanent installation or a removable one.

Clamp-Mount Cable Tray
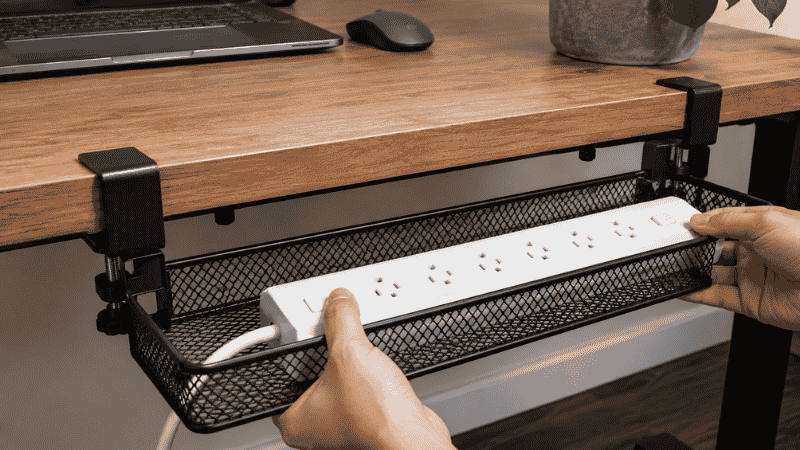
Attaches to the desk edge using adjustable clamps — no drilling, no adhesive, no permanent marks. The clamp mechanism grips the desk edge and holds the tray in place under sustained weight. To remove it, you loosen the clamp and slide it off. Fully reversible.
This is the right choice for most home office setups. It handles the weight of a standard power strip and adapters without issue, installs in under fifteen minutes, and leaves no trace when removed. For renters or anyone who might rearrange their setup, this is the practical default.
What to check before buying: Your desk edge thickness. Most clamp-mount trays work on desks 0.75 to 2.5 inches thick. Very thick desks (solid wood over 2.5 inches) or very thin desktops (some IKEA surfaces under 0.75 inches) may fall outside the clamp range. Measure before ordering.
Screw-Mount Cable Tray (Under Desk)
Attaches to the underside of the desk with screws — more permanent, more stable, and capable of handling heavier loads than clamp-mount options. The tray sits flush against the desk underside rather than hanging from the edge, which gives a cleaner profile.
Choose this type if: you own your desk and furniture, you want the most stable installation possible, or your power setup is unusually heavy (multiple large adapters, a heavy surge protector). The installation requires a drill and takes about thirty minutes, but the result is solid and permanent.
The tradeoff: the screw holes are permanent. If you change your mind or sell the desk, the holes remain. For most people this is a minor consideration; for people with expensive desks or rental situations, it’s worth thinking through.
Adhesive Cable Tray
The simplest installation — adhesive strips on the mounting surface, press and hold, done. These work for very light cable management: a few small cables, a lightweight travel power strip. They do not reliably hold a standard power strip with multiple adapters.
The physics are straightforward: adhesive has a weight limit that decreases over time under sustained load. A full power strip plus six adapters weighs more than adhesive can maintain. The tray will hold initially and fail gradually — usually dropping at the worst possible moment. If the application is lightweight (a few USB cables, a single small adapter), adhesive works. For a full power strip, use clamp-mount or screw-mount.
Metal Cable Tray vs Plastic Cable Tray: What Material Actually Matters
Most cable trays come in two materials: metal mesh and plastic. The choice matters more than it might seem, specifically because of heat.
Metal Cable Tray
Metal mesh is the superior choice for a power strip cable tray. The open mesh construction allows air to circulate freely around the adapters and power strip, which matters because power adapters generate heat during use. Confine multiple adapters in a closed plastic container and the heat builds up — slowly over months, but real enough to affect adapter longevity and in rare cases create a fire risk.
Metal mesh also holds its shape better than plastic over time and is more resistant to the heat it’s containing. For most home office cable trays holding a power strip with multiple adapters, metal mesh is the right call.
The practical note: metal cable trays are heavier than plastic equivalents, which matters for adhesive mounting (another reason to avoid adhesive for metal trays) but is irrelevant for clamp or screw mounting.
Plastic Cable Tray
Lighter, often less expensive, and available in more aesthetic options (white plastic blends into light-colored desk undersides better than black metal mesh). Suitable for lighter cable management needs where heat generation is minimal — a few lightweight cables with no large adapters.
If the tray is holding a full power strip with multiple devices plugged in, the ventilation limitation of solid plastic is a genuine concern. For this application, metal mesh is the better choice even if plastic is cheaper or more convenient.
Cable Management Rack: When a Tray Isn’t Enough
Some setups have more cable bulk than a standard tray can handle — multiple power strips, a tangle of particularly long or numerous cables, equipment with unusually large adapters. For these situations, a cable management rack provides more capacity.
A cable management rack is essentially a larger, more structured version of a cable tray — often with multiple sections, cable routing guides, or the ability to mount the power strip on the rack rather than inside it. These are more common in commercial office settings but are available for home desk use, typically at a higher cost than standard trays.
For most home office setups, a standard cable tray is sufficient. If your power strip is unusually large, if you’re running two power strips, or if you have a standing desk where cable routing is more complex, a rack may be worth the additional cost and installation effort.
Cable Tray Installation: Step by Step
For a clamp-mount tray (the most common home office installation):
- Measure your desk thickness. Measure the edge of your desk at the point where you’ll mount the tray. Confirm it falls within the clamp range listed in the product specs.
- Choose the position. The tray should sit roughly centered under the desk, set back from the front edge so it’s not visible from seated position. Typically 4 to 6 inches back from the front edge of the desk.
- Attach the clamps to the tray first. Slide the clamp brackets onto the tray sides before positioning it on the desk — easier than trying to attach them once the tray is in position.
- Position and clamp. Hold the tray in position under the desk, open the clamp jaws, fit over the desk edge, and tighten. Do both clamps alternately — tighten one halfway, tighten the other halfway, then finish both — to ensure level installation.
- Load the power strip. Place the power strip in the tray before plugging in cables — easier to position without cables in the way.
- Route cables up and over the desk edge. Each cable exits the tray, runs up the desk leg or back panel, then routes along the desk edge to its device. Use cable clips on the desk edge to keep these runs tidy.
- Test stability. Give the tray a firm downward push. It shouldn’t move. If it does, tighten the clamps further or reposition to ensure both clamps are gripping a solid part of the desk edge (not a hollow section if your desk has an internal frame).
Common mistake: routing cables before the tray is fully loaded. Load the power strip, plug in all cables, then route the cables up to the desk. Doing it in the other order makes the routing process significantly more frustrating.
What to Do If Your Cable Tray Isn’t Working
The tray is wobbling or sagging: The clamps are not tight enough or are gripping a hollow section of the desk edge. Reposition to a solid section and retighten. On desks with thin top panels over a hollow frame, the clamp may need to grip the desk frame rail rather than the outer panel edge.
Cables are still visible from certain angles: Route cables to exit the tray at the back rather than the sides. A cable sleeve bundling the runs from tray to desk devices removes individual cable visibility from most angles. → Detailed cable routing guide — how to make cables disappear from every angle.
The tray is full but there’s still cable bulk on the floor: The tray is sized for your power strip but not for excess cable length. Use velcro ties to coil and contain excess cable length inside the tray before routing. Shorter cables (buying cables closer to the length you actually need) eliminate this problem for future purchases.
Heat building up in the tray: You have a plastic tray or a tray that’s too enclosed for the number of adapters inside it. Switch to a metal mesh tray with open sides. If you already have metal mesh and heat is still an issue, the power setup may simply have too many high-draw devices — consider splitting across two power strips on separate circuits.
If You Only Have 10 Minutes Right Now
Don’t have time for a full installation? The single fastest improvement: move your power strip from the floor to the top of a small box or book placed under the desk. Even two to three inches of elevation off the floor changes the visual chaos level dramatically and costs nothing.
This is not a permanent solution — it’s unstable and the box will eventually get kicked. But it proves the concept in ten minutes. Once you see the floor clear, the motivation to install a proper tray is much easier to find.
Frequently Asked Questions
What is a cable tray for a desk?
A cable tray is a container that mounts under a desk and holds cables, a power strip, and power adapters completely off the floor and out of sight. It’s the most effective single tool for cleaning up under-desk cable clutter because it addresses the source — the power strip and the bulk of cable mass — rather than managing individual cables one at a time. Most cable trays mount without drilling using clamp mechanisms on the desk edge.
What is the best under desk cable tray?
The best cable tray for most home office desks is a metal mesh, clamp-mount model in the 18 to 24 inch width range. Metal mesh provides the ventilation that multiple power adapters need; clamp-mount means no drilling and full reversibility. Width should accommodate your power strip plus a few inches on each side for cable routing. Brands like Delamu, JOTO, and Greenice offer well-reviewed clamp-mount metal mesh options in the $20 to $40 range.
Can I install a cable tray without drilling?
Yes — clamp-mount cable trays attach to the desk edge using adjustable clamps with no drilling, no adhesive, and no permanent marks. They’re fully removable and repositionable. The only requirement is that your desk edge thickness falls within the clamp’s adjustment range (typically 0.75 to 2.5 inches). Check the product specs before ordering if your desk has an unusually thick or thin edge.
How much weight can an under desk cable tray hold?
This varies by mounting type and product. Clamp-mount metal trays typically hold 10 to 20 lbs — more than enough for a standard power strip and adapters. Screw-mount trays typically hold 20 to 30 lbs. Adhesive-only trays are rated lower, often 5 to 8 lbs, and their practical capacity under sustained load is even lower. Always check the product’s weight rating and compare it against the actual weight of your power strip plus adapters before purchasing.
Where should I position a cable tray under my desk?
Set back 4 to 6 inches from the front edge of the desk so it’s not visible from a normal seated position. Centered under the desk width is the typical position, but position it closer to whichever side has more cable connections if your setup is asymmetrical. Avoid positioning it directly below where your knees or feet would be — you should be able to sit fully under the desk without your legs contacting the tray.
The Floor Under Your Desk Should Be Clear
A cable tray is one of those purchases that seems small and produces a disproportionately large result. The power strip disappears. The floor clears. The cables that were going in every direction from a floor-level source now originate from a contained, organized point under the desk and route cleanly upward.
It costs $20 to $35. It installs in fifteen minutes. It’s one of the most consistent “why didn’t I do this sooner” upgrades in a home office setup.
Measure your desk edge, choose clamp-mount unless you have a reason not to, and get the metal mesh version if you’re running a full power strip with adapters. The rest takes care of itself.
More from WorkDeskLab:
- Desk Cable Management — The Complete System for Hiding Every Wire
- Under Desk Storage — How to Use the Space You’re Wasting
- Desk Organization Ideas That Actually Stick
- How to Set Up a Home Office That Actually Works
References: National Fire Protection Association — NFPA 70 National Electrical Code: Power strip and extension cord safety guidelines (nfpa.org) · U.S. Consumer Product Safety Commission — Electrical safety in home workspaces (cpsc.gov)